by Helen | Sep 23, 2020 | Lifestyle
Almost with the flick of a switch, summer seemed to end yesterday, and autumn arrived. The temperature dropped and grey skies replaced the bright blue sky we seem have had for weeks and weeks. Although we’re still hopefully weeks away from having to light the woodburners, we definitely craved something a bit substantial and comforting for dinner. Our local Lidl store has been rotating, on a weekly basis, foods from different European countries – Greek week is always a winner in our house, and we’ve been stocking up on Eridanous range of smoked tuna. It is utterly delicious, with a real woody, smoky flavour and when a tin of tuna is called upon in future, I don’t think I’ll be able to have any other kind.

We’ve used this through the summer in salads and wraps but decided something more warming was needed – and our pasta dish was just perfect. It was quick and easy to make and very delicious. Hopefully, if you try it too, you can get your hands on some smoked tuna – it does make all the difference…
what you’ll need
- Penne pasta
- Red onion, finely sliced
- A couple of cloves of garlic, sliced
- Olive oil
- Medium jar of passata or a tin of chopped tomatoes
- 2 small tins of smoked or regular tuna
- Dried chilli flakes
- Strong cheese, for the topping
- Salt & pepper to taste
- Fresh basil leaves
what you’ll need to do
The recipe is as you would expect. Boil the pasta until al dente (it will cook further in the oven). When cooking, fry the onion and garlic until soft, in the olive oil. Sprinkle over the chilli flakes. Add the passata (or tomatoes) and stir until heated through, then add the tuna (chopped up into largish chunks) and a handful of basil leaves. Season according to taste.
Drain the pasta and mix into the tuna & tomato sauce, then turn into an oven proof dish. Cover with the grated cheese and cook for about 30 minutes in a medium oven.


by Helen | Sep 17, 2020 | Renovation
It was back in May that we finally bought a shed and started the job of building it. We made the initial mistake of thinking we’d bought just a shed, like the B&Q one we used to have in our garden back in West Didsbury, which was functional, but a bit on the cheap and flimsy side. We thought that sheds in Istria were a bit pricey because this one definitely wasn’t cheap, but we went for it, because we were becoming frustrated with the search for somewhere that sold these. I’d spotted a beautiful image on Pinterest of how I imagined it might look, and the shape of the one we found was exactly the same, so the search was over.

However, once unpacked, we realised that what we had bought was actually what was known, in shed circles, as a Dutch Log Cabin – a much grander description, I thought 😉 Unfortunately, this particular cabin had to acclimatise and as such, all of the wooden components had to sit out for three days. Not good for someone as impatient as me! But, despite instructions being in Dutch, over the course of a week, we worked it out and soon we had the structure built. The wood was a lovely golden pine – much nicer than the floorboards we inherited and which we’ve only recently finished treating and making good – but we didn’t want pine. The external (and internal) woodwork in the house is a very soft pale blue and so we chose a complementary soft grey satinwood for external use. The bonus with this paint, was that we didn’t need to use undercoat. The tongue and groove wood was caulked inside the shed, for extra protection against the rain, and painted white. Two coats were necessary for the outside, but it was fast drying satinwood and after a couple of additional days painting, the shed was ready. To accessorise!

We couldn’t just be content with the shed, though, because the lovely new colour really showed up the cheap look concrete patio. I love a bit of concrete, but not this kind, and the decision was made that this would be painted, too. As the patio area is a high traffic area, we went for a specialist, waterproof (no undercoat needed) paint, which wasn’t the cheapest option, or the quickest option, but wow, what a difference when we were finished.

Yes, sorry, that is a big tub of cold water for feet and an electric fan outside! On the day this photo was taken, the temperature was mid-thirties and it was VERY hot!

But, a few days later, this was the scene in the garden – and this is where the shed has come into its own. In previous summers, when a storm was approaching, we’d be dragging garden stuff that we didn’t want to get wet, indoors. It would all sit in The Well Room, taking up lots of space, until the weather improved. Now, it’s all found a new home in the shed.

We didn’t buy the shed to use it as a “garden shed”, full of plants pots and garden tools etc. All of that is stored in the external cellar. This was specifically for the quick in and out storage of cushions, sunbed pads, candles, lights, the hammock, sun sails etc. And, so far, it’s been worth every penny (or kuna) we paid. A couple of sets of white metal shelves were bought and fixed to the back wall, so they didn’t topple over – these are perfect to slot in seat pads, cushions, the rolled up hammock and sun towels. Two or three wooden crates are used to keep things together, which we always need in the garden, but have always had to search around the house to find them – one crate for suncreams and mosquito sprays, one for citronella candles, lighters, battery operated lights, and a smaller one full of batteries, bbq lighters etc.

As well as providing great storage, the shed also now gives us privacy. We’ve potted up quite a few tall, thick bamboos and these now sit to either side of the shed, meaning that we don;t have to consider building a wall at the front of the house anymore. The BBQ will have a winter home, as will our wellies and umbrellas and general winter stuff we don’t want in the house. The quality of it is in no doubt, having had some very strong and ferocious summer storms – no leaking or water ingress and it’s solid. Who knew you could love a shed as much?

by Helen | Sep 14, 2020 | Lifestyle
Our nearest town, Oprtalj, isn’t really a town. At least not in the sense of what we’d regard as a town back in the UK. Oprtalj is not much bigger than Burton Road in West Didsbury, but with a couple of restaurants, a cafe bar, a school, a food shop, an interiors shop, a gallery, a boutique hotel, a loggia, a church, a campanile, a cashpoint (rare in these parts), a town hall, a post office and a town square, it has plenty going for it. Many of the properties in Oprtalj were abandoned over the years – successive regimes ensured that many families upped sticks and left – and so there are plenty of buildings which are being reclaimed by nature. But, life is being breathed back into Oprtalj. Like much of Istria, tourism is a big industry here (and so the area has been hit hard this year), so many of the properties have been bought and redeveloped. However, once inside the city walls, there are very strict regulations as to what you can and can’t do to one of these old properties – even the external paint colour has to be from an approved list, but it does mean that that sympathetic restoration is ensured.
Sitting on the top of a hill, the town has stunning views across the Istrian countryside – vineyards and forests and small villages and in the distance, the shimmering Adriatic. In the winter, when the clouds are low, we can be shrouded in fog, making it really atmospheric – it’s hard to imagine on days like these, how beautiful the vista below actually is. But during the summer – and especially this summer, when days have been long and hot and lazy – it really comes into its own, especially when the sun shines on the pastel coloured buildings. Being so close to Italy, and having been ruled over by Italy throughout the ages, Oprtalj has a real feel of a Tuscan hill town. It really is our little corner of Italy…


by Helen | Sep 8, 2020 | Lifestyle
Waste not, want not. We’re trying very, very hard to live a much more sustainable lifestyle and to really take note of what we buy. In the past, we might have popped into Manchester and come bag with bags of *stuff* that we just didn’t need. We don’t do this now. Because we’ve kind of had to start from scratch, with our Istria house, we’ve had to be a lot more careful. OK, we had all of Manchester furniture and boxes of accessories etc, but we also now have a house with a whole lot more floorspace, so we’ve had to think carefully about how we furnish and accessorise it. Upcycling and recycling has played a much bigger part this time around – and it’s very satisfying to see something we’ve actually created. But this is not the only aspect of our lives, where we’re trying to be more careful. Rather than chucking food which we think looks a bit “off”, we now try to eat what we buy when it’s fresh. Or, certainly in my case, being a bit braver with food and not think I am going get food poisoning if it’s a day or two past its best. Like the ciabatta loaf that hadn’t been eaten quickly enough this weekend, and was too hard to do much with. Like the tomatoes which had gone a bit too soft. Like the jar of anchovies which had been opened for a pizza a couple of nights previously and needed to be eaten. Then I remembered a dish I had always intended to make – but then never got round to, because I’d always chucked the perfect ingredients for this recipes. Those a bit on the stale side, and just past their best. No excuses this time, as I had everything to hand to make panzanella.
Panzanella (or panmolle) is a Tuscan salad, the main ingredients being stale bread, onions and tomatoes, with red wine vinegar and olive oil. We had a few more ingredients to hand, so threw these in, too. The easiest and quickest dish to make – even adding in the additional time to roast the peppers.
what you’ll need
- Stale ciabatta loaf
- Over ripe mixed tomatoes, roughly chopped
- 1 handful small capers (drained)
- 1 small red onion – peeled and finely sliced
- A couple of red peppers, chopped & roasted – make sure the skin blackens in places for extra flavour
- About 10 small anchovy fillets in oil, drained and chopped up
- Red wine vinegar
- Extra virgin olive oil
- Parmesan cheese
- Salt & pepper
- Torn up fresh basil leaves
what you’ll need to do
- Chop the red peppers, smother with olive oil and black pepper and roast for about 30 minutes.
- Place the chopped tomatoes in a big bowl and season with salt and pepper, and then add the red peppers when roasted.
- Rinse the capers, squeeze out any excess liquid and add to the bowl, along with the sliced, red onion, ciabatta and anchovies.
- Toss the mixture together with your hands, then stir in a splash of red wine vinegar and about 3 times as much extra virgin olive oil.
- Taste and add a little more salt, pepper, vinegar or oil, if needed.
- Tear in the basil leaves, stir together and grate parmesan cheese over the salad.
Serve, with a lovely glass of chilled wine. The perfect Italian salad, using what you probably have in the kitchen anyway.


by Helen | Sep 1, 2020 | Lifestyle
I’m a big fan of easy-peasy dishes, which include as few pots and pans as possible. And, as little time spent in the kitchen, as possible. Summer here has been very hot and currently we don’t have the luxury of air con, so our summer cooking has involved many BBQs and salads and things which are left to themselves, so we can escape the heat of the kitchen. I caught an advert on TV for Jamie Oliver’s new series & part of the clip was Cauliflower Cheese Pasta – the tiny bit that I saw was enough to get me out purchasing a fresh cauli, as I knew that this dish would be a stunner. And it was!

The outer leaves of my cauliflowers usually end up in the compost bin, as I’m never really sure what to with them. Well, this recipe clears that one right up. All parts of the cauliflower are used. And I bet if I told you that this recipe is actually a spaghetti dish, smothered in the creamiest, silkiest sauce – made up mostly of cauliflower – with a crispy, crunchy topping (those leaves!), you probably wouldn’t believe me. So, here’s the recipe and how it turned out…
what you’ll need
- 100 g stale bread (we used frozen breadcrumbs)
- 2 cloves of garlic
- ½ a head of cauliflower (400g)
- olive oil
- 1 onion
- 400 ml semi-skimmed milk
- 300 g dried spaghetti
- 70 g Cheddar cheese
what you’ll need to do
- Tip the breadcrumbs into a food processor.
- Peel and add the garlic, along with a couple of outer leaves from the cauliflower
- Add ½ a tablespoon of olive oil and blitz
- Tip into a large non-stick frying pan on a medium heat and cook for 15 minutes, or until golden and crisp, stirring occasionally and put to one side, in a bowl
- Meanwhile, peel the onion, then roughly chop with the cauliflower, stalk and all
- Pour in the milk and add the chopped veg, bring just to the boil, then reduce the heat to low, cover and simmer
- Cook the spaghetti in a pan of boiling salted water and just before it’s ready, carefully pour the cauliflower mixture into the processor
- Grate in the cheese, blitz until super smooth, then season to perfection, and return to the pan
- Drain the pasta, reserving a mugful of starchy cooking water
- Toss the pasta through the sauce, loosening with a splash of reserved cooking water, if needed
- Serve with the cauliflower cheese spaghetti sprinkled with the crispy crumbs
This dish really is the best variation on a cauliflower cheese recipe I’ve evre had. Because it uses spaghetti, rather than pasta shapes, it seemed to feel a lot less “bulky”. And although I adore cheese, and can sometimes over use it, I stuck largely to the recipe – and I definitely don’t think the taste suffered in any way. It was also good to use a vegetable and know that absolutely none of it had gone to waste.


by Helen | Aug 18, 2020 | Lifestyle
For the first year since we’ve been here, the damson trees around the garden, are absolutely laden with fruit. Maybe they have been in previous years, too, and possibly we’ve been too busy with summer visitors and renovation work, to notice, but we’ve definitely noticed this year. The bees and butterflies are in abundance, buzzing around the trees and tucking into the fallen fruits. We even have a rabbit who visits and seems to almost get intoxicated on the fruit. The trees (middle in photo below) are heavy with them and the thud of falling fruit is a familiar sound this summer. We’ve been picking and cleaning the damsons for a couple of weeks now and freezing them – and after a supermarket run to buy some cheap gin, we’ve started making the damson gin…


Today has been the perfect day, as after days and days of sunshine and high temperatures, a storm rolled in, so we had a day indoors. As we’ve never fruit trees before, I’ve never made any kind of gin, assuming it to be very difficult. Well, not so!
A litre bottle of fairly cheap gin (wasn’t going to use the good stuff) was divided between two sterilised kilner jars. 500g of our frozen damsons were bashed up a bit with a mallet, in the freezer bag, and 250g added to the gin in each jar. 125g of golden caster sugar was then added and both jars given a good old shake. This’ll be repeated daily for a week, until the sugar has dissolved and then the jars will be put it in a cool, dark place and left for 2-3 months.The plan then will be to use a coffee filter cone, to hopefully achieved a refined gin, and the liquid will be strained through it. This will then be decanted into clean, dry bottles, which will be sealed and labeled. By Christmas, we hope the gin will be ready to drink 🙂 Meanwhile, I’m just liking checking on my first attempt at gin distillery…


by Helen | Aug 6, 2020 | Renovation
I’ve been sorting through hundreds and hundreds of online photos, from when we first viewed what was to become our home in Istria to now. To a couple of days ago, when weather stopped DIY play in the garden. We’ve been sorting because, as we have now decided to sell the house, we wanted to reflect on how far we’ve come. And boy, just house-wise, we’ve come a LONG way! We’re not interior designers and we’re definitely not builders. We knew absolutely no-one when we landed here. Although we had recently renovated our house in West Didsbury, we had not a clue how to begin renovating a very different style of house in a completely new and unfamiliar country. But, needs must – and we realised pretty quickly that it we wanted some creature comforts around us, we just had to work it out. Looking at these before & afters, from around the house, we feel pretty proud of ourselves because we think we did work it out…
the snug
So called, because now, in the winter, it is so snug and cosy. But, as you can see, it wasn’t quite so snug when we moved in. This room is under the living room and was partially decorated – a couple of the walls had been plastered and painted but it was mostly in a very unfinished state, The stairs down into it were very precarious, to say the least. But – and this was a real positive – it was dry. Not a sign of damp, we knew we could make something of it. The installation of our Dovre woodburner (and new internal chimney) has made a huge difference to this room – especially on colder days. And, only very recently, we found out that this room used to be where the cattle were housed. Where the chimney is now, there used to be a huge arch with double doors, with a ramp leading in front of the garden area. The stairs weren’t there and it wasn’t open, up into the rest of the house. I wonder what the cows would make of it now? 
the living room
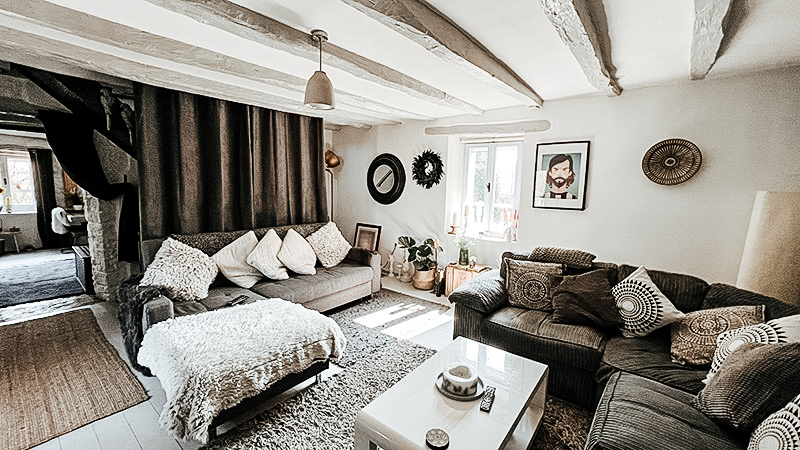
 The living room very dark, with much exposed stonework and even though it’s a large room, it felt claustrophobic. The dark furniture which we inherited, didn’t help. One of the first decisions we made was to get rid of all of the furniture -ours was on its way from Manchester – and to paint all of the walls and ceiling brilliant white, and the woodwork, a very soft pale blue. The pine floorboards were also painted, which really lifted the room. Eventually the wall opposite the grey sofa above was painted a deep, rich navy blue, as were the stairs, but we think we’ve still retained a feeling of space and lightness in this room.
the kitchen
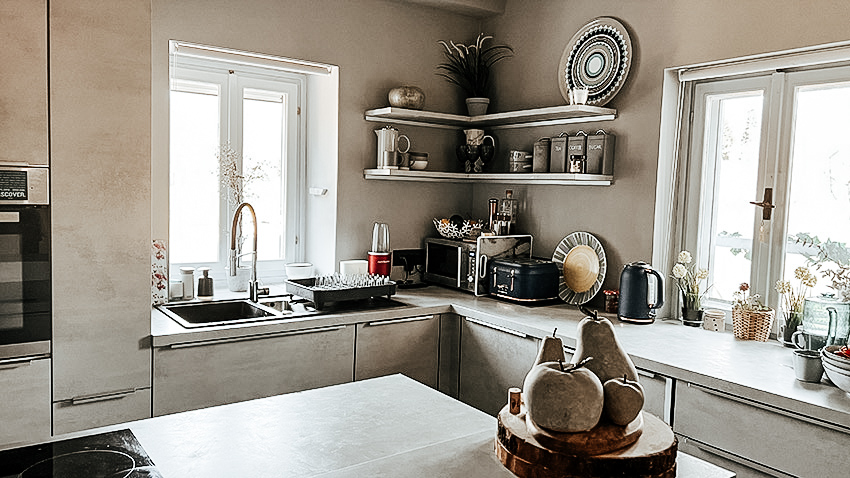
Oh, my word. The kitchen! Although it was probably the most “complete” room in the house, it was also the one we wanted to tackle first.The units were ill-fitting, the floor tiles definitely not to our taste and the one window (to the right hand side) also poorly fitted – it wouldn’t open because the sink tap was in the way… This room had to dealt with by the professionals – we had the kitchen designed and fitted by a company in Slovenia, and all the building/electrical work done by a small of team people we’ve got to know. *Networking* – absolutely key to build up a trusted group of people. Everything was ripped out of the kitchen, including that low, false ceiling, to reveal the original beams. New lighting was installed and new plumbing to accommodate the sink being moved to below the new window we had fitted. The room isn’t the largest, but we’ve accommodated everything we need, including a lovely new breakfast bar with integrated hob on the other side. Perfect for perching with a vino, while the other cooks 😉 Underfloor heating, new flooring and accent lighting finishes off the room, which we painted completely in Farrow & Ball Hague Blue. (We couldn’t squeeze in our condenser tumble dryer, but this is accommodated under the stairs down in The Snug, behind floor length curtains, and our old fridge freezer is in the outside cellar as an overspill). 
the well room
Now, this was a curious room. The front door opens straight into this room and when we bought the house, it was a bit like an outdoor space, but indoors. The walls were exposed stone, the beams were rough and ready and the floor was big slabs of cold, Istrian stone. Plus, slap bang in the middle of the room, therefore making it completely unworkable as a space, was a stone well, with a big metal bucket, suspended by a chain and pulley, sitting on top of it, and used for drawing water. Yes, when the lid was lifted it was apparent that this was still potentially a working well, as it was full of water.  A big stone platform, against the rear wall, completed the cold, outside feeling of the room. The door the right, led into a very dingy downstairs bathroom – meaning that all in all, this room wasn’t creating the best impression as the entrance to our new home. Things have been done gradually in this room, because of of necessity it has been a makeshift kitchen, a storeroom, a work room and a place for dumping various builders’ tools and pieces of machinery. But we’ve reclaimed it and are delighted what we’ve achieved :
- The well was drained over four days, and re-sited outside the front door, and the down-pipe diverted so it didn’t begin to fill again. Once the chamber was fully dry, LED lighting was installed underneath the rim of the hole in the floor and a triple glazed, reinforced safety glass cover fitted – strong enough to take weight. We don’t think about walking over it now, but it takes a bit of nerve initially!
- Once the well was out of the way, we had space for a dining table and so had a concrete table built, in-situ.
- The big stone platform was painted white, a wooden side built and foam pads used as a “seat”. Many cushions, throws and faux sheepskins have helped us to create a very comfy sofa/day-bed. Also perfect if you need somewhere for an unexpected guest.
- The walls (with the exception of the wall outside the bathroom, which was painted the same colour as the floor), the ceiling and the beams were painted white and a false wall was built behind the stone platform as we decided to add insulate this part of the room. A shelf was created with soft LED lighting.
- The cold stone floor was thought about FOREVER, but it became increasingly clear that what ever we did with it was going to be costly and complicated because of its uneveness and the fact that the walls it meets are also very uneven. Hence we think, why the previous owners might have just left this room. However, we really didn’t like the cold stone so the whole thing was eventually painted with very durable, navy blue concrete paint. Perfect.
downstairs bathroom
 As soon as a we moved in, this little room was immediately whitewashed, as it was immediately off the Well Room and we just needed it be brightened up and looking a bit, well – cleaner. But, as with all of the rooms in the house, there was only so long we could live with it. Unsurprisingly, for a house which was not used very often, the sanitary ware wasn’t the sturdiest or the prettiest, the shower cubicle was quite frankly, horrible, and the room was poorly laid out. As in, a cheapo toilet, visible to all when the door was opened. A complete no-no, in my book! So, as with the kitchen (and, perhaps with hindsight, stupidly, at the same time) the downstairs bathroom was smashed out and reconfigured with new sanitary ware. A wall-mounted toilet was moved to where the shower cubicle used to be, therefore completely private. With underfloor heating and big concrete tiles, a wet room was created, meaning that without a cubicle, we created a sense of much more space. Much, much more pleasant a showering experience!
stairs and upstairs landing

The stairs down in to The Snug and up to the first floor, and spindles and handrail (there was nothing going down into The Snug – health & safety alert!), and floorboards, were not of the best quality pine. And not fitted very well, either. However, over time, we’ve addressed all of this. The treads on the stairs were pulled forward and all secured, with a back attached to each flight, so now you don’t see through the treads. They’ve been painted in a deep navy blue, as have the floorboards and the handrails and spindles. Industrial piping and fixtures have been used to create grab-rails going down into The Snug – we scratched our heads for along time trying to work out a safe solution here. The angle was difficult, but, we think we’ve found a super stylish – and unique solution!

All walls and the apex ceiling are painted white, and we’ve finally sorted the exposed beams, which are now also white. The upstairs doors are on our “to replace” list, but we’ve just not had the chance yet, so they are painted the same soft baby blue as the windows and shutters.
bedroom 1
If I’m honest, I’m hard pressed to say which is my favourite room. It depends on the time of day, season, whether it’s hot or chilly. But, I’d say this bedroom was a contender. When we buying the house, this room was almost a game-changer. We came out to see it with the couple who were selling, and we stayed overnight in this room. Because no-one had been in the house for over a year, nature had taken over, and this room was clearly home to one of the biggest spiders I have ever seen in my life. It seriously gave me the heebie-jeebies and after being convinced that a spider could not possibly be a good enough reason for pulling put of buying our dream home in the sun, I vowed that this room would be spectacular, to banish the memory of our eight legged visitor. 
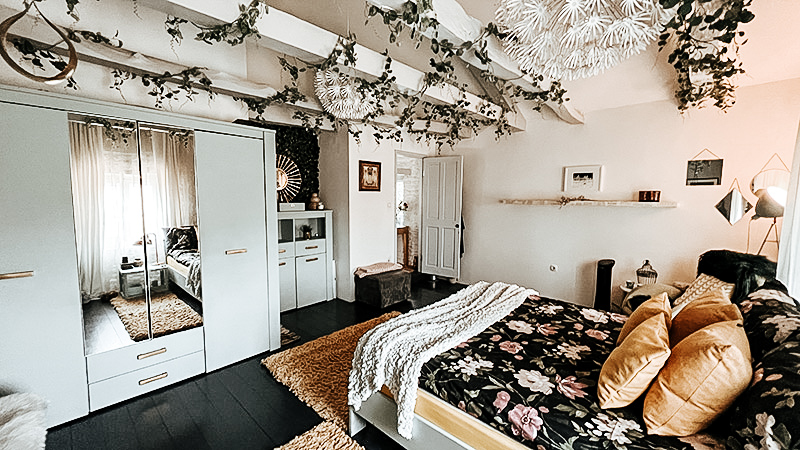
I think we’ve achieved a spectacular room. It may not be to everyone’s taste, but we LOVE it. It’s huge, with a soaring apex ceiling and two windows with amazing views across fields and an orchard, up to the village. It’s painted completely white, with floor length curtains, which we never need to close as we have complete privacy.

bedroom 2
From an unpainted room, with bare pine floorboards and two sets of bunk beds, we tackled this bedroom first, as the big bedroom, in the early days, was full of packing boxes. White walls, white ceiling, pale grey beams and very soft pale blue blue woodwork, coupled with a navy blue wooden floor transformed it. As this is primarily a guest bedroom – although we do tend to move into here in the winter, as it has the internal chimney from the wood-burners below and is so cosy – we decide to glitz it up a bit with gold spray paint…


bedroom 3
Same story as Bedroom Two – a bit of a sorry room, this time with a sad looking single bed. For this room, we bought two new single beds, which are usually joined as a double, but give us flexibility for visitors. The walls, ceiling, woodwork, beams and floor were painted the same as the other bedrooms and voila… A whole new room!

upstairs bathroom
A full rip-out was again all we could really do with this room. While everything else was being renovated, we limped along with this bathroom, but the bath was so small, it was impossible to actually have a bath. This has now been sprayed black and is in the garden, planted up with three blooming honeysuckle climbers – *that* is how small it was 😉 A full size bath has now been fitted with a gorgeous new square ceramic sink and matte white and silver taps. Like the rest of the house, white walls, pale grey beams and navy wooden floor. A new boiler, with an increased capacity, makes bathing an absolute joy.
 It’s been a long journey and it’s been bloody hard work – even given that the big jobs have been done by the professionals. But, we want to live in a home that is cosy and comfortable and has an element of style and individuality. We think we’ve done it – and now cannot wait to get going again, as we plan our next adventure…

by Helen | Jul 30, 2020 | Lifestyle
I have absolutely no idea if this dish has any Greek roots but it just reminds me of those oh-so-wholesome stewy-fish dishes that you often find in Greek tavernas. The ones located right next to the sea, with a bamboo awning, covering you from the hot sun as the water laps at your feet. The ones where the fish is so fresh, you’ve just watched it being caught.
Unfortunately, despite pretty close to the Adriatic now, we’re not good at fishing and so our tuna was of the frozen variety. But handily in cubes – so perfectly cut already for a stew or a skewer on the barbecue. I like nothing more than a good stew, where everything is tossed into one pot or pan and allowed to just bubble away and get on with things, and this is pretty much what this dish is.
what you’ll need
- tuna – we used frozen cubes, but if you fancy cutting up fresh tuna, that’d work just as well, if not better
- two large potatoes, peeled and cubed
- two peppers, de-seeded and roughly chopped
- one fresh chilli, de-seeded and chopped finely
- two large cloves of garlic, crushed or finely sliced
- one large onion, roughly chopped
- chopped fresh tomatoes
- olive oil
- chilli flakes
- veggie (or fish, if you prefer) stock
- a glug of white wine
- salt & pepper
- fresh parsley

what you’ll need to do
- Sear the tuna cubes (sprinkled with sea salt) in a skillet, with olive oil (just a couple of tablespoons) on a high heat, for about 3 minutes, turning all the time so that all sides brown. Set aside on a plate.
- Boil the peeled and cubed potatoes.
- Saute the garlic, onions, peppers and fresh chillies until soft. Season with salt and pepper and a sprinkling of dried chilli flakes.
- Add the boiled potato cubes and roughly chopped fresh tomatoes, with about two cups of veggie stock (or fish stock), and a splash of white wine.
- Simmer for about 30 minutes, until the liquid begins to turn to a light broth consistency.
- Take off the heat and add the browned tuna cubes and sprinkle with fresh parsley. Leave for about three minutes for the the tuna to begin to soak up the broth.
Serve with crusty bread or sourdough, or as we did, warm pitta breads. Summer in a bowl…


by Helen | Jul 20, 2020 | Lifestyle
Although I grew in the semi-rural North East of England, it’s been a long time since I’ve lived in a house and looked out of the windows and seen fields. The move to Manchester in 1985 lasted until we left in 2017. Thirty two years of city living – and suddenly in Match 2017 we found ourselves in our stone house in the Istrian hills. And, we’ve not looked back. We realised pretty quickly, because we had to start making contacts and navigating our way through a whole new life, that although the nearest supermarket was about 20 kms away, it took more or less the same time to get to it as it could to drive from our house in West Didsbury to Sainsbury’s in Cheadle. But this journey now takes us through medieval towns and past vineyards and to the Adriatic coast. Not the A34…
so, three years on, how’s country life?
Well, it is pretty amazing. We have four distinct seasons now, as opposed to Manchester seasons which largely merged into one. Spring is wonderful here – a switch really does flick. The pattern seems to be a couple of weeks of heavy and sustained rain in April and then all of a sudden, the greenery explodes. By June, Spring gives way to the hot, mostly dry, Summer. Although, we do get intense downpours, accompanied by ferocious thunderstorms – but these are usually gone as quickly as they arrive. Early harvesting happens here – we’ve just had a week of real country activity in the fields next to our house. Combine harvesters arriving first thing and hay bales in place by early evening. The landscape changes a lot in the summer as local farmers make the most of the glorious weather conditions. The weather starts to markedly cool down towards the end of October, but we can still have days when we eat outside. It’s always a sad sight when the greenery begins to drop – but we do a have couple of weeks, when nature puts on a real show of colour, as the reds and oranges take hold. Winter can be cold and damp and wet – but it can also be pretty spectacular. Days and days of bright blue skies and sunshine. And, perhaps what I like the most and expected the least, snow. Deep, deep snow. Making the house look like very Alpine. The added bonus of woodburning stoves makes our house in the country very special at this time of year.
spring

summer

autumn

winter

So, country living. From being city dwellers, with every convenience on our West Didsbury doorsteps, we seem to have adapted pretty well. Although if our current plans come to fruition, we may be moving back to the city. That’s what our nearest town is called by some people around here – although with a population at the last census of 850, we don’t think we’ll be feeling too overcrowded and hemmed in…

by Helen | May 27, 2020 | Renovation
For the first time this year, we made the trip to Pula. Normally, we’d by now, be making fairly regular trips to the airport to pick up and drop off visitors, but this is no normal year. Our first trip, done with a bit of trepidation, was to Bauhaus and Pevex, our equivalents of B&Q, to purchase the garden shed, paint, plants and assorted garden accessories. We paid a fair bit more than we were expecting to, but just thought sheds here might be more expensive than back in the UK – and as we didn’t want to add to the cost with paying for delivery (approx 70 euros), it was monkey-gripped onto the top of the car and driven back. On unwrapping it, we realised why it was more expensive than we had anticipated – it wasn’t a shed, like the ones we’ve had previously. This was desribed as a Dutch Log Cabin and the wood was clearly much, much better quality. Being a very impatient person, I didn;t like the fact it had to be unwrapped and all of the panels and wood laid out, to acclimatise, for two days! However, I was persuaded that we do this right. So, progress has been much slower than I anticipated, but we’re getting there.

First job, once the wood had acclimatised, was to seal the slats which would form the floor, with a moisture proof sealant. Luckily, the weekend was quite hot, so drying was rapid.

The idea had been to position the shed at the far end of the concrete patio, facing the new kitchen window. But, as soon as we placed down the floor to assess the size, we remembered that this part of the garden is on the long to-do list. When it rains heavily, water pools in this area, and we need to drill in drain holes, so we decided against this position, opting for the right hand side instead.

The wall which we’ve been considering for ages, is no longer going to be a wall. We thought we’d made a decision and were going to go for a boundary wall made of those geometric patterned blocks, which everyone had in their gardens in the ’70s. Much as we do love this idea, we decided that if we are going to sell the house, this kind of wall might not be to everyone’s tastes and so we’ve decided that with a few more potted bamboos we can create a thick natural wall – which we can then take away with us, eventually.

By Sunday evening, we’d managed to get this far – but are back on it again today. Once the roof has been installed and the door fixed, all gaps will be caulked before undercoating and top-coating. And then – accessorising…